Aidetech Solutions has developed an innovative, convenient and easy way of presenting tabular-style data in ASR. You will notice that a lot of information you're storing and reading in/from ASR is presented in a form of a grid. Presenting data in such a format, as opposed to, for example, using predefined forms, offers much greater flexibility and ease of use of working with your data as well as much better use of "real estate" on a screen.
An example of a grid in ASR:

The grids in ASR works in Microsoft Access® -like fashion plus much more advanced sorting, grouping, and filtering functionality.
Sorting
Users can sort data in ascending order in every ASR grid by clicking on the column header of the grid. Once the data is sorted by that column, the column header will show a "sorted" icon next to its caption:

Clicking on the sorted column header again will sort the data in the descending order:

It is possible to sort by more then one column. For example, if you want to sort customers by First Name and then by Last Name, hold down the Shift key on the keyboard while clicking on the First Name and then the Last Name column headers and then release the Shift key. The data is now sorted by two column in ASR. It is possible to sort by any number of columns in ASR grids. You can also sort the data by multiple columns in ascending or descending order. Several examples:


Grouping
Users can group data in ASR grids (where grouping is enabled). Grouped data gives a more organized view on the grid data rows and offers a convenient way of analyzing data in the grid rows. Grouping data in the grids is done by dragging any column header from the grid into the "Group Box" area of the grid. The "Group Box" area is denoted by "Drag columns here to group by that column" caption:

Once the column header is dragged into the Group Box, the data will be grouped by that column. Each group can be expanded or collapsed. Data can be sorted in the groups in ascending or descending order.

Filtering Data
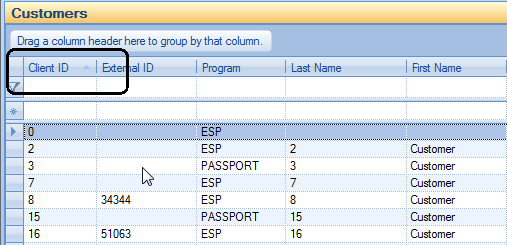
Users can filter data in ASR grids (where filtering is enabled). This offers a quick and easy way of looking for and analyzing data in the grid especially when number of rows in relatively large. Filtering of data is done by defining a "Filter Pattern" in the filter row (or "Filter By Form"). The filter row is a top-most row of the grid where the row header contains the funnel icon:

To define a filter users need to key in pieces of data that the resultant rows must contain. For example, to look for customers having First Name start with "Jo", type "Jo" (without the quotes) in the First Name column of the filter row:

Click Enter on the keyboard and the data is now filtered. The Screen Title will also display "(Filtered)" to indicate that the data currently presented in the grid contain only a subset of all available data:

You can filter data by any number of columns in ASR grids. Each filter in the column will denote additional criteria that the resultant rows must contain in order to "pass" the filter. For example, to show all Jo* M* customers, the filter will look like this:

Adding New Records
Adding new records in ASR grids is done by typing the data of the new record in the "New Record" row. The New Record row is located on top of the grid and displays an asterisk in the row header:

Once all necessary data you want to key in for the new record is entered, click Enter on the keyboard to commit the record into ASR. Should there be any errors in the data, you will be presented with an error dialog describing the problem. In case of an error the data will not be committed. You can fix the data entered and click the Enter again when done. Once data us saved, the data of the new record now appears as a regular record in the grid and the New Row record is shown blank and is ready to accept next set of data:
Before data is committed:

After data is committed:

Editing Existing Records
Editing existing records in ASR grids is done by typing the data of the record right in the row in the grid. Mouse click in the row and column you want to edit and either type the new data (in free-text type columns) or select a new value from a drop down list (in case of drop-down type columns). The row header will display the "editing..." icon in the row header to indicate that the data is being changed in that row.
![]()
Once the data is edited press Enter on the keyboard or simply click the mouse anywhere outside the edited row to commit the data.

Deleting Records
Deleting records in ASR grids is done by highlighting the row and by clicking on its row header and clicking the Delete button on the keyboard. A confirmation dialog is displayed to make sure the row is not being deleted by accident.

Once confirmed, the row will be deleted from the database and removed from the grid.